[Note]: If you have landed on this page directly from a google search or through an external link then i recommend to have a look at this Blog Post.
Current blog post explains how to retrieve data from Dynamics CRM to CRM Portals using Liquid Template.
Use Case/Scenario: We will try to fetch all appointments available in CRM on to Portal
Step 1: Prepare FetchXml
Current blog post explains how to retrieve data from Dynamics CRM to CRM Portals using Liquid Template.
Use Case/Scenario: We will try to fetch all appointments available in CRM on to Portal
Step 1: Prepare FetchXml
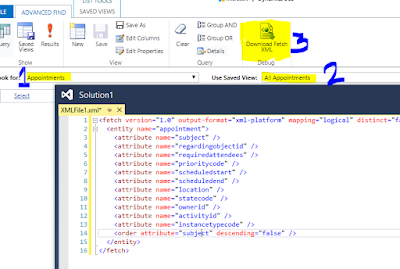
1. Open CRM Instance
2. Go To Advanced Find > Select Appointment Entity > Select View as 'All Appointments'
3. To make sure you have some data, click the "Results" button on Ribbon
4. Download the FetchXml using ribbon button on header.
Step 2: Prepare Web Template
1. Go To: Portals > Web Template > New

2. Provide below details
To view the JSON Response: Append the 'Partial Url' Name provided in Step 4 to the Portal Url.
Ex: https://<<Portal Instance>>.microsoftcrmportals.com/<<Partial Url>>/
There is your data in JSON format from CRM Instance on to Portal.

Call this url from Javascript using XmlHttpRequest and handle the JSON response in any of the Javascript files.

1. Go To: Portals > Web Template > New

- Name: Name of your Web Template
- Website: Select your Portal instance
- Source: Here goes your Liquid Template, this is very easy to build and use.
- Load data into local variable: Using 'Liquid Template FetchXml' tag, we will load the resultant data into a variable called 'appointments'. Below code snippet shows the syntax. Add fetchxml tag provide your variable name and paste your fetch xml code inside fetchxml snippet.

- Render data using local variable: We will loop through the results of appointments and display the data. Make sure you add '{{' and '}}' for the variables to display the value. This is a Liquid Syntax.


- MIME Type: provide value as 'application/json', this ensures the output content rendered in json format.
Step 3: Prepare Page Template
In step 2 we have created a web template. A web template needs to be embedded in a Page Template and Page Template should be applied to a Web Page to get it rendered on portal.
Lets see how to create a Page Template
1. Go To: Portals > Page Template > New
2. Provide Below Details
In step 2 we have created a web template. A web template needs to be embedded in a Page Template and Page Template should be applied to a Web Page to get it rendered on portal.
Lets see how to create a Page Template
1. Go To: Portals > Page Template > New
2. Provide Below Details
- Name: Name your Page Template
- Website: Select your Portal
- Type: Select 'Web Template', by default it would be rewrite.
- Web Template: Select the web template created in Step 2.
- Use Website Header and Footer: Uncheck the Checkbox. As we are planning to have a JSON response from server, we do not require header and footer for our page. It would be a plain JSON response.


Step 4 [Last Step]: Create a 'Web Page'
1. Go To: Portals > Web Pages > New
2. Provide Below Details
2. Provide Below Details
- Name: Name your 'Web Page'
- Website: Select your Portal
- Parent Page: Select 'Home' page
- Partial Url: Provide the Url name. Remember this one, we will need it on portals. This name should be appended to the portal url to view this web page.
- Page Template: Select the Page Template created in Step 3
- Publishing State: Published. Setting this will publish your web page on portal.


You are all set now!
Open your Portal Instance in browser, Make sure you are logged in, This is very important. If not you will get an empty response from server.
To view the JSON Response: Append the 'Partial Url' Name provided in Step 4 to the Portal Url.
Ex: https://<<Portal Instance>>.microsoftcrmportals.com/<<Partial Url>>/
There is your data in JSON format from CRM Instance on to Portal.

Call this url from Javascript using XmlHttpRequest and handle the JSON response in any of the Javascript files.
Nice Blog, Thanks for share an amazing information dynamics 365 customer portal
ReplyDelete